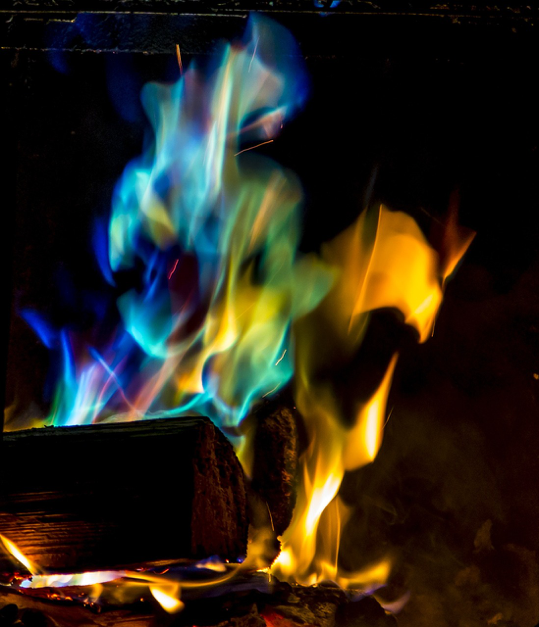
Here’s a fun fact: when set ablaze, certain substances can produce unusual colors of fire. No, we’re not talking about the bright blue flames of a gas stove or fireplace; nearly everyone’s seen that. But, have you ever seen a fire that’s green, vivid red, or even purple?
Rainbow fires have been delighting folks of all ages for decades. There’s something about brightly-colored flames that seem almost magical! Commercial kits for creating colored fire can be found online, but if you’re a DIY kind of person, it’s possible to do this project at home. You don’t need a lab or any special equipment. All it takes is a few pinecones, a wood-burning fireplace, and some stuff you may already have around the house.
Hazard Map
Before we get started, here are some caveats:
1. DO NOT try to make a colored fire in a gas fireplace!
You should never, ever burn wood or other foreign objects inside of a gas fireplace; doing so can cause serious damage to its inner mechanisms and ventilation system. If your house is equipped with a gas fireplace, you may need to wait until you have access to a campfire before you can create technicolor flames.
2. Make sure your fireplace and chimney are working properly.
Burning chemicals can release noxious fumes into the air, and smoke is never safe to inhale. So before you even think about doing this project, verify that your chimney is venting correctly. If it’s been more than a year since your chimney was inspected, make an appointment to get it looked at ASAP.
3. Adult supervision is required.
Anytime a project essentially boils down to playing with fire, children and teens should not attempt to do it on their own. A responsible adult should oversee any and all experiments involving open flames. If your children are very young, you may want to have them watch while you handle all of the actual labor.
4.Be careful.
You’re going to be working with substances that, while not dangerous per se, should be handled with caution. So keep them away from children, pets, and wild critters. Be sure to dispose of everything properly, too.
Get it Together
If the previous section didn’t scare you off of this project completely, here’s what you’ll need to make it happen:
- Pine cones. These can be found at craft stores for relatively cheap; just make sure that they aren’t painted or treated with other substances. You can also obtain them for free by walking around outside and grabbing them as you go. If you choose the latter option, wash them as soon as you get home, lest you wind up introducing bugs and spiders into your house. Any pinecones that close up during the washing process can be coaxed open again by placing them in a 200°F oven for about an hour. Use a cookie sheet to catch any sap that may drip out while the pinecone is being baked.
- A bucket. Err on the side of caution by using one that’s made of sturdy plastic instead of metal. If you’d like to make multiple colors at the same time, each one will require a separate bucket.
- Always a good idea when you’re handling potentially harmful substances.
- Tongs or a slotted spoon. Also, a good idea when you’re handling potentially harmful substances.
- Hot water. Tap water will suffice.
- Powdered/granulated Chemicals. Here’s where it gets interesting! Different substances will yield different colors, so keep your desired result in mind as you “pick your poison.”
- For yellow flames, use sodium chloride. AKA regular table salt.
- For deep red flames, use strontium chloride. Look for this with the saltwater aquarium supplies at your local pet store.
- For purple flames, use potassium chloride. Commonly found in no-sodium salt substitutes.
- For green flames, use hydrogen borate. AKA boric acid; it’s most easily obtained in the form of borax laundry detergent.
The above substances aren’t the only chemicals that you can use to color fire; for example, copper sulfate will produce blue flames. However, we recommend sticking to the above options, as they’re pretty easily (and safely) obtainable. And some compounds are only available for school or laboratory use, anyway. Please don’t do anything dangerous or fraudulent during the material-gathering process; we’re not taking the blame if your attempts to buy lithium chloride get you placed on a government watch list!
Color my World
Once you have all of the materials gathered up, you can actually get this show on the road. As with any project, it would be wise to read through all of the instructions before you start.
1. Using the bucket as a vessel, dissolve one of the selected chemicals in hot water.
The amount of each that you’ll require depends upon how many pinecones you’re planning to soak. Start with a ½ gallon of water per 1 cup of powder and adjust as needed. If you want to make multiple colors at the same time, use additional buckets. DO NOT mix the different powders together!
2. Once the powder has dissolved completely, add your pinecones.
See to it that the pinecones are completely covered by liquid.
3. Allow the pinecones to soak overnight.
You can stir them occasionally to better facilitate chemical absorption, but it’s really not necessary to do so.
4. Remove the pinecones from the solution and allow them to air-dry.
This will probably take about three days, so try to be patient. Surfaces can be protected from the wet pinecones with newspapers or paper towels.
Once the pinecones are completely dry, you’re done! Next time you build a fire, you can add a few of these little wonders in with the rest of the wood and enjoy the fruits of your labor. Start with one or two cones at a time and add more if you’d like. Do not mix multiple colors at once.
We don’t normally recommend “playing” with your fireplace, as doing so can be dangerous—or at least costly in the long run. Still, making funky-colored fire is a fun, relatively safe trick to pull off, and it’s educational, too. Do it for its scientific merit, or do it just to create something beautiful. Either way, the above steps can make for a pretty entertaining evening!